These days a .NET developer can create, test and deploy powerful software without breaking sweat. Writing a scalable, easily deployable performant ASP.NET Core microservice is easier than ever. The cool thing about using Docker is run automated tests against that soon-to-be-written service in an environment that was quickly created and immediately disposed once the testing is done.
In this post I will walk you through the steps needed to create a simple microservice using ASP.NET Core with a data access that uses Marten to save and retrieve information from a PostgreSQL.
If you’re impatient and want to see the end result – the code for this post is available in GitHub – feel free to dig in.
Ingredients
In order to write and run the code you’ll need the following:
- Visual Studio 2017 (any edition)
- Docker for windows
and that’s about it. The cool thing is that everything else will auto magically arrive to your computer via either NuGet or docker images.
Once you have Visual Studio and Docker for Windows installed – keep on reading…
Creating a new microservice
Start by using File->New project and choose ASP.NET Core Web Application.

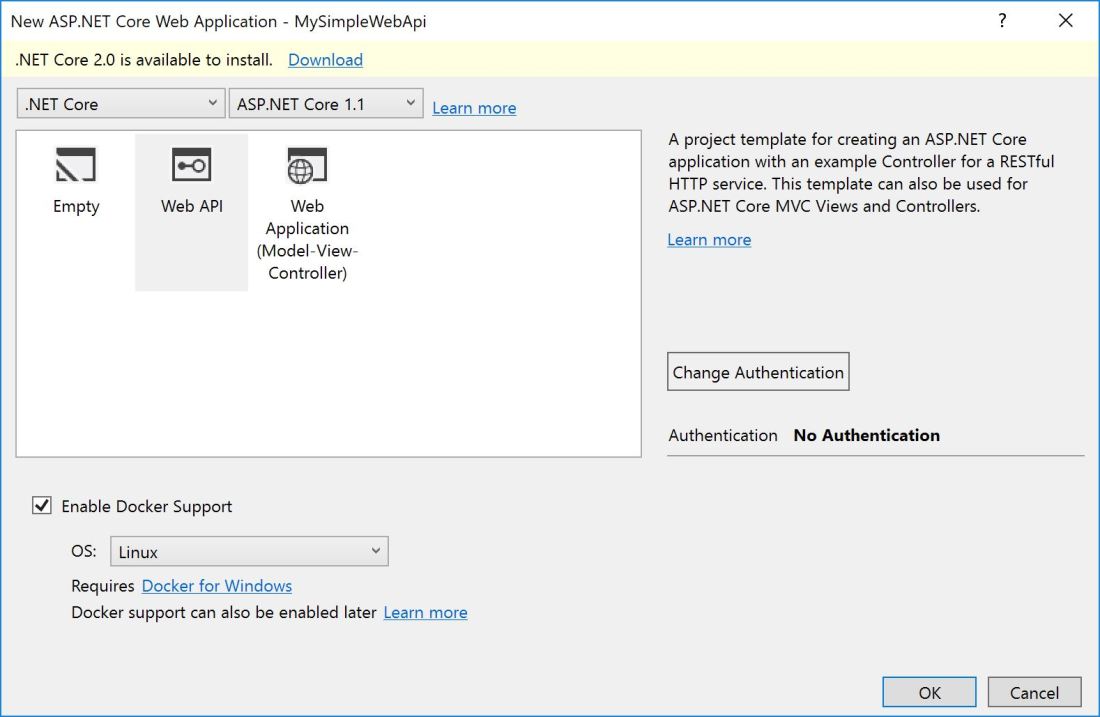
Choose Web API application and make sure Enable Docker Support is selected. If you miss this step – don’t worry, you can easily add Docker support by right clicking on the project file and choosing “Add Docker Support” later.

A word about .NET Core versions: At the time of the writing a newer version of ASP.NET Core is already publicly available. I choose to use v1.1 since that’s what I currently use at work, and installing the newer version (as urged by the dialog above) caused a bunch of compilation and dependency issued which I prefer not to have right now. As far as I can tell, the instructions below would work with V2.0 as well – if not, that’s what the comment section is for.
The default service has a basic HTTP based web api. In the created solution we have one project containing the service and one other “project” for the Docker compose file(s) – but we’ll get to this one in a moment. Right now out service is pretty simple and there’s two files we’ll update in a short while:
- Startup.cs that we’ll use to wire together to components we’ll need
- ValuesController.cs – this is where the service definitions will be written and for this simple demo, we’re the actual implementation will exist as well. Keep in mind that in a real project we’ll probably have a layer or two between the presentation (controller) to the data layer (database).
Additional dependencies
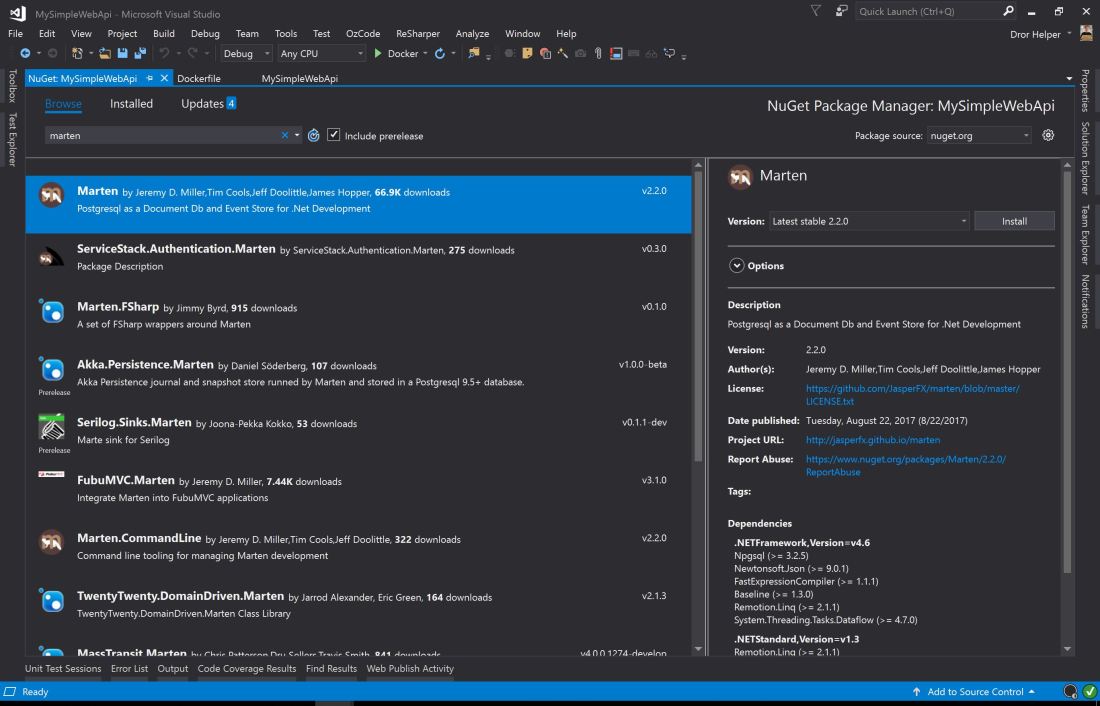
Using the magic of NuGet we’ll add a few useful libraries. First things we’ll add Marten. Marten is a documentDB (on top of other things) built on top of PostgreSQL. In order to use Marten we’ll need two things – a few assemblies which we’ll quickly add using NuGet and a running instance of Postgres which will sort out later.

Although not mandatory I’ve also added Swashbuckle.AspNetCore so that I’ll be able to “see” the service and play with it – once you add a few trivial lines to Startup.cs:
Inside ConfigureServices add the following:
services.AddSwaggerGen(c =>
{
    c.SwaggerDoc("v1", new Info { Title = "Simple demo", Version = "v1" });
    var basePath = PlatformServices.Default.Application.ApplicationBasePath;
    var xmlPath = Path.Combine(basePath, $"{PlatformServices.Default.Application.ApplicationName}.xml");
    c.IncludeXmlComments(xmlPath);
});
And in the Configure method add the following:
app.UseSwagger();
app.UseSwaggerUI(c => { c.SwaggerEndpoint("/swagger/v1/swagger.json", "My simple API"); });
Most importantly – don’t forget to enable xml documentation the to project file (as I tend to do each and every time).
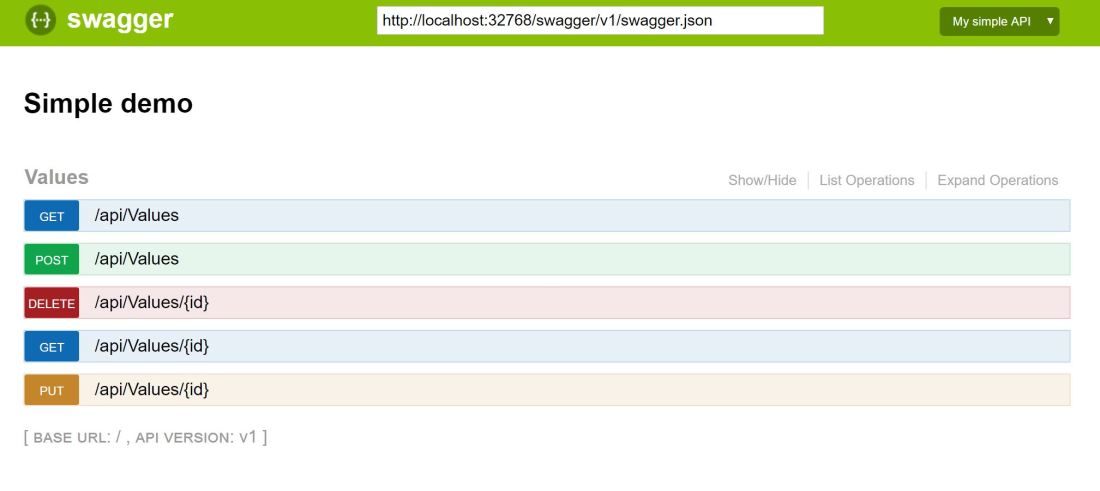
If you run the service and go to http://localhost:{ServicePort}/swagger you should see the following:

Now you can debug the service from the comfort of your favorite web browser.
Connecting the database
Now that we’ve done with the basic setup we can add “real” code – first let’s turn the value saved and loaded in the basic temple into an entity – by creating a new SimpleValue type:
namespace MySimpleWebApi.Controllers
{
    public class SimpleValue
    {
        public int Id { get; set; }
        public string Value { get; set; }
    }
}
And now we’re able to store and retrieve the service’s files.
Since xml documentation is enabled you will get a few warnings during compilation. The compiler will complain about each public type and method which does not have comments – for the three slashes kind (“///”). I usually add comments where applicable and use pragma to ignore the ones that are left afterwards.
For data access we’ll write a simple data access class:
internal class SimpleDataAccess
{
    private readonly string _connectionString;

    public SimpleDataAccess(string connectionString)
    {
        _connectionString = connectionString;
    }

    private IDocumentStore Store
    {
        get
        {
            var store = DocumentStore.For(_ => {_.Connection(_connectionString); });
            return store;
        }
    }

    public IEnumerable<string> GetAllValues()
    {
        using (var session = Store.QuerySession())
        {
            return session.Query<SimpleValue>()
                           .Select(simpleValue => simpleValue.Value)
                           .ToArray();
        }
    }

    public string GetValueById(int id)
    {
        using (var session = Store.QuerySession())
        {
            var simpleValue = session.Load<SimpleValue>(id);

            return simpleValue?.Value;
        }
    }

    public int AddNewValue(string value)
    {
        var newSimpleValue = new SimpleValue { Value = value };

        using (var session = Store.OpenSession())
        {
            session.Store(newSimpleValue);

            session.SaveChanges();
        }

        return newSimpleValue.Id;
    }

    public void AddNewValue(SimpleValue simpleValue)
    {
        using (var session = Store.OpenSession())
        {
            session.Store(simpleValue);

            session.SaveChanges();
        }
    }

    public void DeleteById(int id)
    {
        using (var session = Store.OpenSession())
        {
            session.Delete<SimpleValue>(id);

            session.SaveChanges();
        }
    }
}
Teaching about Marten is outside of the scope of this humble post but let’s see if I can explain the code above: it all starts and with acquiring an IDocumentStore object (lines 10-17) and once you have that you can open a session (there are several types of those) and CRUD the heck out of the database using .NET objects – and let Marten handle all of the heavy lifting. If you want to learn more about Marten – all you have to do is read its excellent documentation.
Once we have the data class (SimpleValue) and data access (of the simple kind) we can update the controller to use both to load and store data but we’re still missing one component – a working database – and this is where Docker comes into place.
Using docker-compose to deployed PostgreSQL
Now that we have to code ready it’s time to set the environment. If you like you can install Postgres on your machine but you do not need to – because: Docker.
Open docker-compose.yaml file you should see services section with the definitions for the service we’ve just created and now we can add environment variable that would be used by the service – in this case the connection string for the DB.
version: '3'

services:
    mysimplewebapi:
        image: mysimplewebapi
        build:
             context: ./MySimpleWebApi
             dockerfile: Dockerfile
        environment:
            DB_CONNECTION_STRING: "host=postgres_image;port=5432;database=values_db;username=dbuser;password=dbpwd"
The docker-compose file is simple to read and all you need to add (for now) is the last two lines so that we’ll have a new environment variable that the database needs (the connection string). The Postgres connection string is simple to read and we’ll configure the database accordingly. In this case our service will look for the database on a machine called postgres_image on port 5432 and connect to a database called values_db using credentials dbuser and dbpwd.
In addition to the new service we need to make sure there’s a database we need to take care of – which can be done by adding the following to the docker-compose file:
    postgres_image:
        image: postgres:alpine
        ports:
            - "5432:5432"
        environment:
            POSTGRES_USER: "dbuser"
            POSTGRES_PASSWORD: "dbpwd"
            POSTGRES_DB: "values_db"
What we have here is a new image defined. and since we did not provide any details it would be taken from Docker Hub. Line 4 is about exposing ports from the docker image to the outside world (a.k.a localhost) in this case we tell docker to expose port 5432 (postgres default port) to the same port on my machine. so basically it’s me telling docker to expose through local port from docker.
Next comes a few environment variables – you can get the full list in Postgres Docker Hub page.
Tip: Docker-compose is a delicate soul and as such would not tolerate using the wrong number of tabs for indentation – I’ve used spaces above for the sake of the blog post but if you copy paste the code above make sure to replace the leading spaces with tabs.
Putting it all together
Now all we need to do is have the Controller initialize SimpleDataAccess and update the method calls to use it.
[Route("api/[controller]")]
public class ValuesController : Controller
{
    private readonly SimpleDataAccess _dataAccess;

    public ValuesController()
    {
        connectionString = Environment.GetEnvironmentVariable("DB_CONNECTION_STRING");
        _dataAccess = new SimpleDataAccess(connectionString);
    }

    [HttpGet]
    public IEnumerable<string> Get()
    {
        return _dataAccess.GetAllValues();
    }
If you ever seen WebAPI you should feel right at home. Usually I would use proper dependency injection for SinpleDataAccess but that’s for another post. Once you update all of the methods to use the database (or get the code from GitHub) you start storing and retrieving values from the database – how cool it that!
One last thing – automated testing
Using Docker means that we easily write integration tests for the new service. There’s nothing easier than spinning up a database and throwing it away once the tests ends. And for that I’ve written a base class that would handle all of the ugly details of creating, initializing and cleaning up. Using the new base class (which we’ll get to in a moment) means that you can write the following test without breaking sweat:
[TestClass]
public class ValuesTests : PostgresTestBase
{
    [TestMethod]
    public void Post_SingleValue_GetByIdReturnsValue()
    {
        var controller = new ValuesController();

        var postResult = controller.Post("1234");
        var result = controller.Get(postResult);

        Assert.AreEqual("1234", result);
     }
The test above uses a real database created before the test and deleted immediately afterwards.
Notice PostgresTestBase? this is where the magic happens:
[TestClass]
public class PostgresTestBase
{
// Definitions
[TestInitialize]
public void StartPostgres()
{
if (_process == null)
{
_process = Process.Start("docker",
$"run --name {ImageName} -e POSTGRES_USER={Username} -e POSTGRES_PASSWORD={Password} -e POSTGRES_DB={DbName} -p {PostgresOutPort}:{PostgresInPort} postgres:alpine&amp;lt;/pre&amp;gt;
// Wait until PostgreSQL instance is ready - look in GitHub for details
var started = WaitForContainer().Result;
if (!started)
{
throw new Exception($"Startup failed, could not get '{TestUrl}' after trying for '{TestTimeout}'");
}
}
Environment.SetEnvironmentVariable("DB_CONNECTION_STRING", ConnectionString);
}
[TestCleanup]
public void DeleteAllData()
{
var store = DocumentStore.For(ConnectionString);
store.Advanced.Clean.CompletelyRemoveAll();
}
[AssemblyCleanup]
public static void StopPostgres()
{
if (_process != null)
{
_process.Dispose();
_process = null;
}
var processStop = Process.Start("docker", $"stop {ImageName}");
processStop.WaitForExit();
var processRm = Process.Start("docker", $"rm {ImageName}");
processRm.WaitForExit();
}
}
This base class handles all of the database infrastructure. a word of warning, MSTest has a few quirks and one of them is that the TestInitialize, TestCleanup & AssemblyCleanup methods would only run if the class is marked as TestClass – you’ve been warned.
TestInitialize would run before each test and make sure there’s a database ready by using Docker from the command line to run a new database and wait till it’s ready. That docker image would be cleaned in the AssemblyCleanup method.
Between runs I clean the table(s) using Marten so that one test won’t affect another test by leaving leftover data – that’s the store.Advanced.Clean.CompletelyRemoveAll() call.
That’s it
So there you have it a working http based, multi-platform, microservice with a document based DB backend – the buzzwords just keep on flowing.
The cool thing is not the fact that writing that code was simple, is the fact that is was so simple it enables a developer to concentrate on the important stuff – creating content using best practices and provide value to the customer. Docker enables a powerful build pipeline that takes a a working service, test and deploy it in a simple, maintainable way.
And on top of that it runs on Linux – but you don’t need to worry about it…
Simplify the AddNewValue methods by removing the code duplication please.
Keep in mind this is was not the purpose of this example, but feel free to create a pull request – I would appreciate it
Thanks for this, absolutely great. I was not aware of Marten so just an added bonus. Can I download the code somwhere?
Yes it’s on GitHub: https://github.com/dhelper/MySimpleWebApi