Today at work I’ve needed to create a quick solution to provide a client application with data stored in AWS. It has been a while since the last time I’ve used C# in AWS so I thought I’ll give it a try, and after a few hours of tinkering I had a solution up and running, ready for integration with the client API.
Ingredients
- You’ll need to have a valid AWS account, if you never, ever used AWS you can sign up for the free tier.
- Visual Studio Community Edition – preferably 2019 (the current latest and greatest)
- Install AWS Toolkit for Visual Studio
Once you have everything installed you get to the fun part where we get to do stuff.
Creating the initial code
This is simpler than you think:
Step 1 – Open Visual Studio
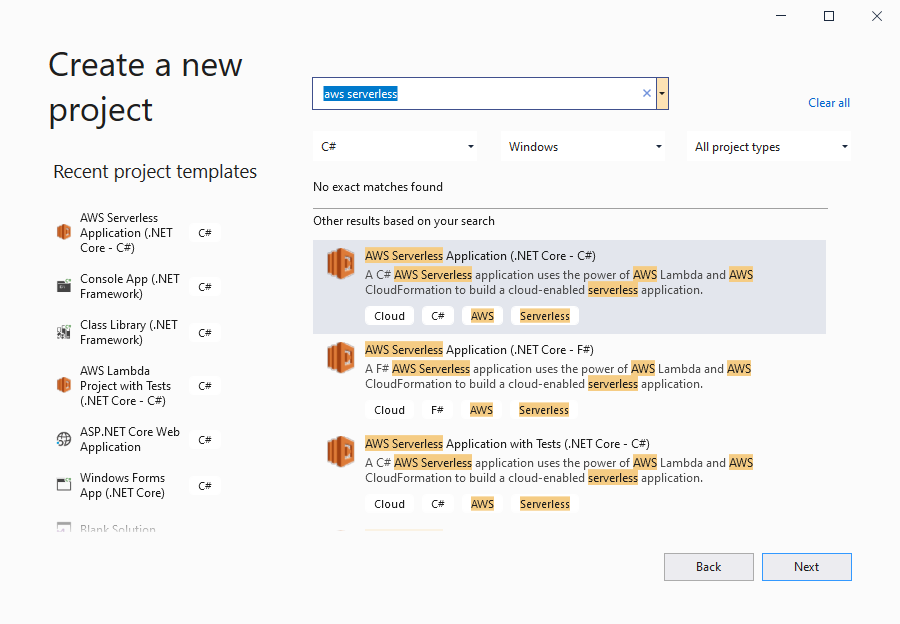
Step 2 – create a new project
Step 3 – Choose a serverless application of a language of your choosing (C# of course)

Step 4 – fill project name, folder etc.
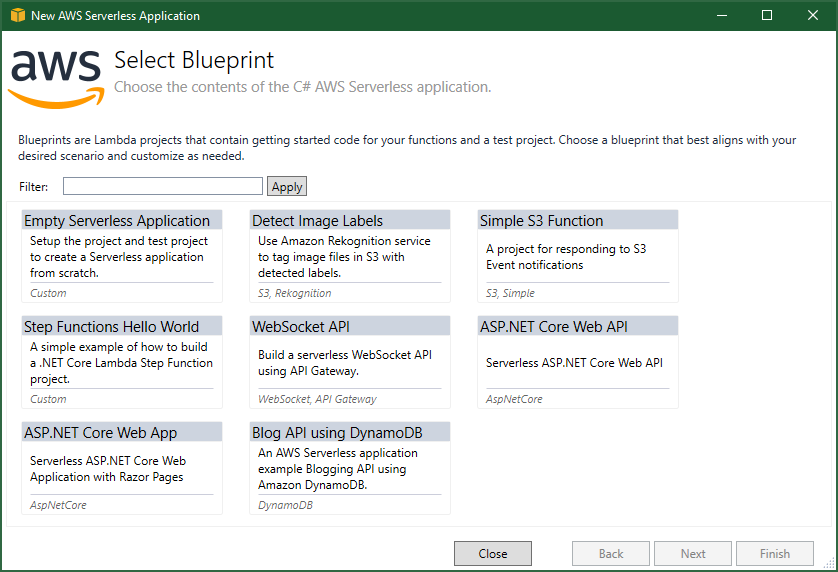
Step 5 – choose as blueprint, those are great starting points that will help you get up and running.

At this point you will have code that looks familiar to anyone who ever wrote an ASP.NET Core API project in the past but it would run as a Lambda function behind API Gateway:

There’s quite a lot there both good examples on how to use Rest API by adding Controller and logic that would enable running the Lambda’s code locally (under IIS), but for the purpose of this post I’d like to focus on serverless.template file.
Infrastructure as code using serverless.template
There are a few ways to define your resources as script/code, one of those is AWS CloudFormation which let you define your functions, buckets and other resources using “easy” to read and quite-confusing-to-write syntax. There are better ways to author Cloud Formation templates such as AWS-CDK or in this case AWS SAM (Serverless Application Model).
SAM is built on top of Cloud Formation with Lambda based applications in mind and the initial template looks something like this:
...
"Resources": {
    "AspNetCoreFunction": {
      "Type": "AWS::Serverless::Function",
      "Properties": {
        "Handler": "AWSServerless2::AWSServerless2.LambdaEntryPoint::FunctionHandlerAsync",
        "Runtime": "dotnetcore3.1",
        "CodeUri": "",
        "MemorySize": 256,
        "Timeout": 30,
        "Role": null,
        "Policies": [
          "AWSLambdaFullAccess"
        ],
        "Environment": {
          "Variables": {
            "AppS3Bucket": {...}
          }
        },
        "Events": {
          "ProxyResource": {
            "Type": "Api",
            "Properties": {
              "Path": "/{proxy+}",
              "Method": "ANY"
            }
          },
          "RootResource": {
            "Type": "Api",
            "Properties": {
              "Path": "/",
              "Method": "ANY"
            }
          }
        }
      }
    },
    "Bucket": {...}
    }
  },
After running the wizard we’ll end up with a Lambda function, and a Bucket (which we won’t talk about today).
The Lambda function defines the API gateway’s paths, see the path defined as /{proxy+}? this means that calls arriving to the API gateway will be forwarded to the Lambda functions to be handled by our Controller(s).
Right now, you can update the code and deploy the newly created Lambda from Visual Studio. I could do that and call it a day, but in my case I’ve needed to add API key to my API gateway…
Tweaking the solution – adding API Keys
In order to use API key, we need to define a usage plan and update the Lambda/API Gateway definitions.
First, we’ll start by defining the API Gateway’s properties, it was hidden in the background until now but now we’ll need to explicitly define it under Resources:
"ApiGatewayApi": {
    "Type": "AWS::Serverless::Api",
    "Properties": {
        "StageName": "Prod",
        "Auth": {
            "ApiKeyRequired": "true"
        }
    }
}
- We needed to add this definition to add “ApiKeyRequired”: “true”
Now we’ll need to update the Lambda Events to use the new API Gateway definitions:
"AspNetCoreFunction": {
    "Type": "AWS::Serverless::Function",
    "Properties": {
        ...
      "Events": {
            "ProxyResource": {
                "Type": "Api",
                "Properties": {
                    "Path": "/{proxy+}",
                    "Method": "ANY",
                    "RestApiId": {
                        "Ref": "ApiGatewayApi"
                    }
                }
            },
            "RootResource": {
                "Type": "Api",
                "Properties": {
                    "Path": "/",
                    "Method": "ANY",
                    "RestApiId": {
                        "Ref": "ApiGatewayApi"
                    }
                }
            }
        }
    }
},
- We’ve used RestApiId to create a connection between the new API Gateway definition and the Lambda Endpoint.
And Finally define the new API key, usage plan and connect the two:
"ApiUsagePlan": {
    "Type": "AWS::ApiGateway::UsagePlan",
    "Properties": {
        "ApiStages": [
            {
                "ApiId": {
                    "Ref": "ApiGatewayApi"
                },
                "Stage": "Prod"
            }
        ],
        "Throttle": {
            "BurstLimit": 200,
            "RateLimit": 100
        }
    }
},
"ApiUsagePlanKey": {
    "Type": "AWS::ApiGateway::UsagePlanKey",
    "Properties": {
        "KeyId": {
            "Ref": "ApiKey"
        },
        "KeyType": "API_KEY",
        "UsagePlanId": {
            "Ref": "ApiUsagePlan"
        }
    }
},
"ApiKey": {
    "Type": "AWS::ApiGateway::ApiKey",
    "Properties": {
        "Name": "my-api-key-name",
        "Enabled": "true",
        "StageKeys": [
            {
                "RestApiId": {
                    "Ref": "ApiGatewayApi"
                },
                "StageName": "Prod"
            }
        ]
    }
}
And we’re done, if you deploy the Lambda using the new SAM definitions you’ll have an Lambda behind an API Gateway, protected by a key which you need to pass in each message in the header (x-api-key). You can open your AWS console, navigate to your region of choice, and find the API key in the API Gateway page and then send that API key to the client and you’re done.

Obviously, you’ll need to add authentication/authorization but that’s a story for a different time…
And until then – happy coding…
Hey there. I just found your article and, after adding the code you’ve provided, VS is telling “ApiGatewayApi is an invalid type for this reference” in the Aws::ApiGateway::UsagePlan and AWS::ApiGateway::ApiKey sections. Any ideas? I’ve been googling it for too long…
“Obviously, you’ll need to add authentication/authorization but that’s a story for a different time…” Any ideas where to start?